Chapter 2.2: Babylon JS GUI and Working with Data
A lot has changed in the project since my last update on Chapter 2.1. This post will cover some changes to the detail card, creating compact cards, working with 2D and 3G GUI, and passing data from Vue to the Babylon JS scene. Let’s dive right in with the updated Detail Card.
2D and 3D GUI
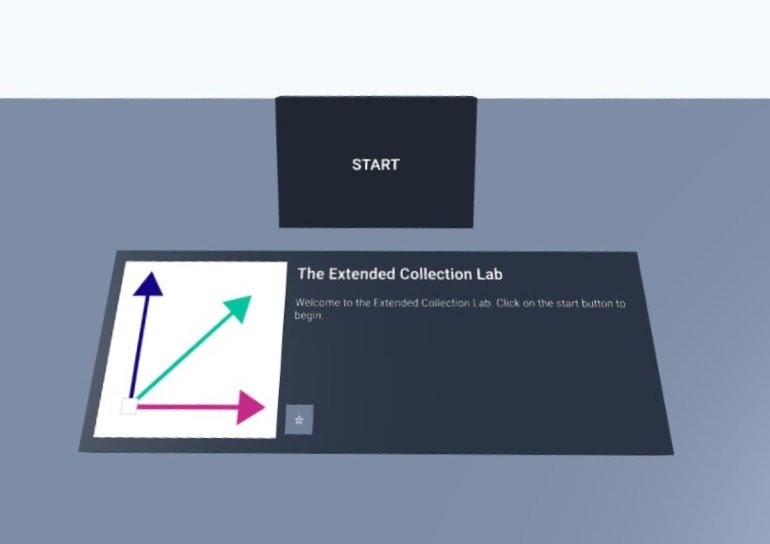
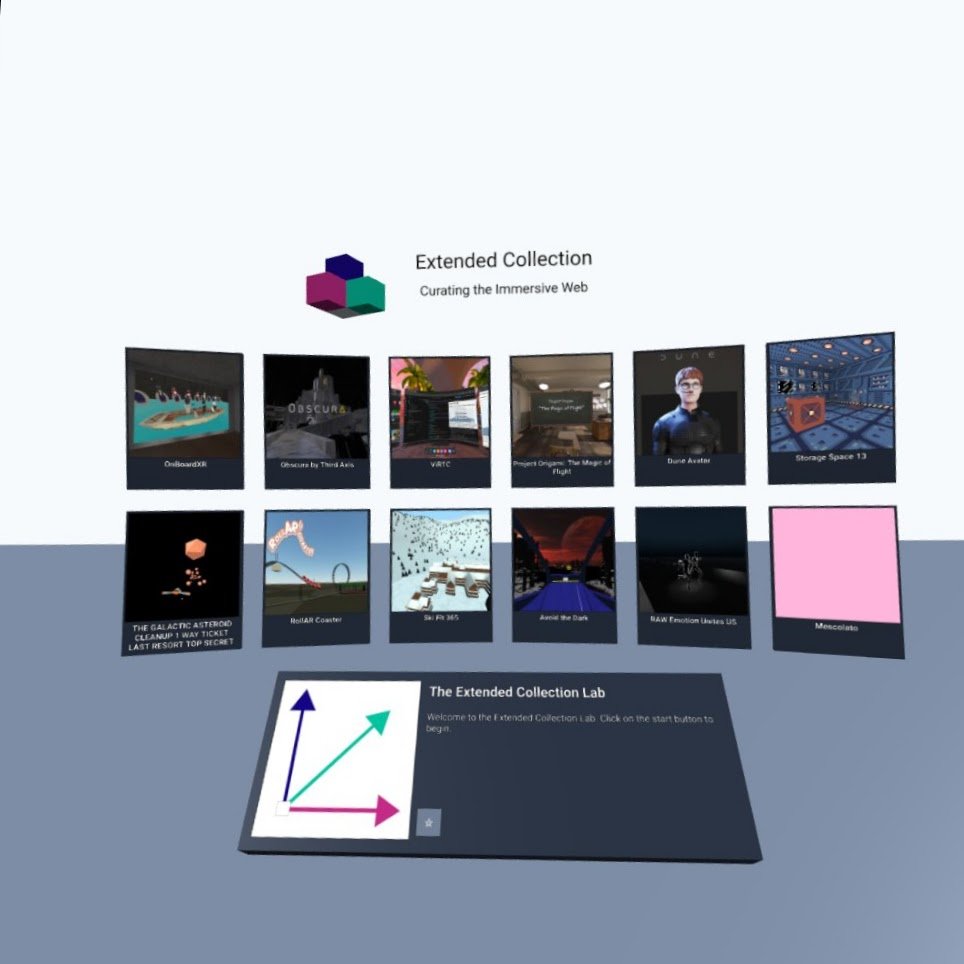
During the A-Frame chapter of this series, I settled on a design where the user could select a compact card, and the card would turn into the detail card and move forward to another position. For this chapter, I decided to take a different approach. I wanted a detail card that stays in one place and is populated with data from the compact cards. To that end, I redesigned the detail card layout from “tall and narrow” to “short and wide”. Here are the previous and current versions of the detail card.


Designing the compact cards was simple. I followed the same process that I used on the detail card, omitting everything except for the image and title. I can pass an array of compact cards to a 3D GUI Sphere Panel to layout them out in two rows. These cards are wrapped in a Mesh3DButton to make them interactive. Clicking on one will send the data from the selected card to the detail card.

Over the weekend I decided to upgrade the project to use the recently announced beta version of Babylon JS 5.0. This latest version is packed full of new GUI features and refinements to existing ones. For example: sending data from the compact card to the detail card is now just a matter of querying the scene graph for the detail card texture, then getting controls by name to set their data. Previously, I had to keep a reference to the texture and pass it to each compact card.
const compactCardButton = new MeshButton3D(card, `compact-card-button-${item.id}`);
  compactCardButton.onPointerDownObservable.add(() => {
    // The Advanced Dynamic Texture that that main detail card uses to draw UI
    const texture = scene.getTextureByName("detail-texture");

    // Get controls by name/string and update them with data from the item
    texture.getControlByName("detail-title").text = item.title;
    texture.getControlByName("detail-description").text = item.description;
    texture.getControlByName("detail-image").source = item.image;
  });
I’ll have a lot more to say about GUI in Babylon JS 5.0 in the coming weeks and months.
Working with data
There are a lot of ways to work with data in the context of Vue and Babylon JS. While this example app may be a bit contrived, it affords me the opportunity to explore these approaches with a simple use case in mind. I can focus on the implementation without getting bogged down in a larger design process.
You can follow along by referring to the code here.
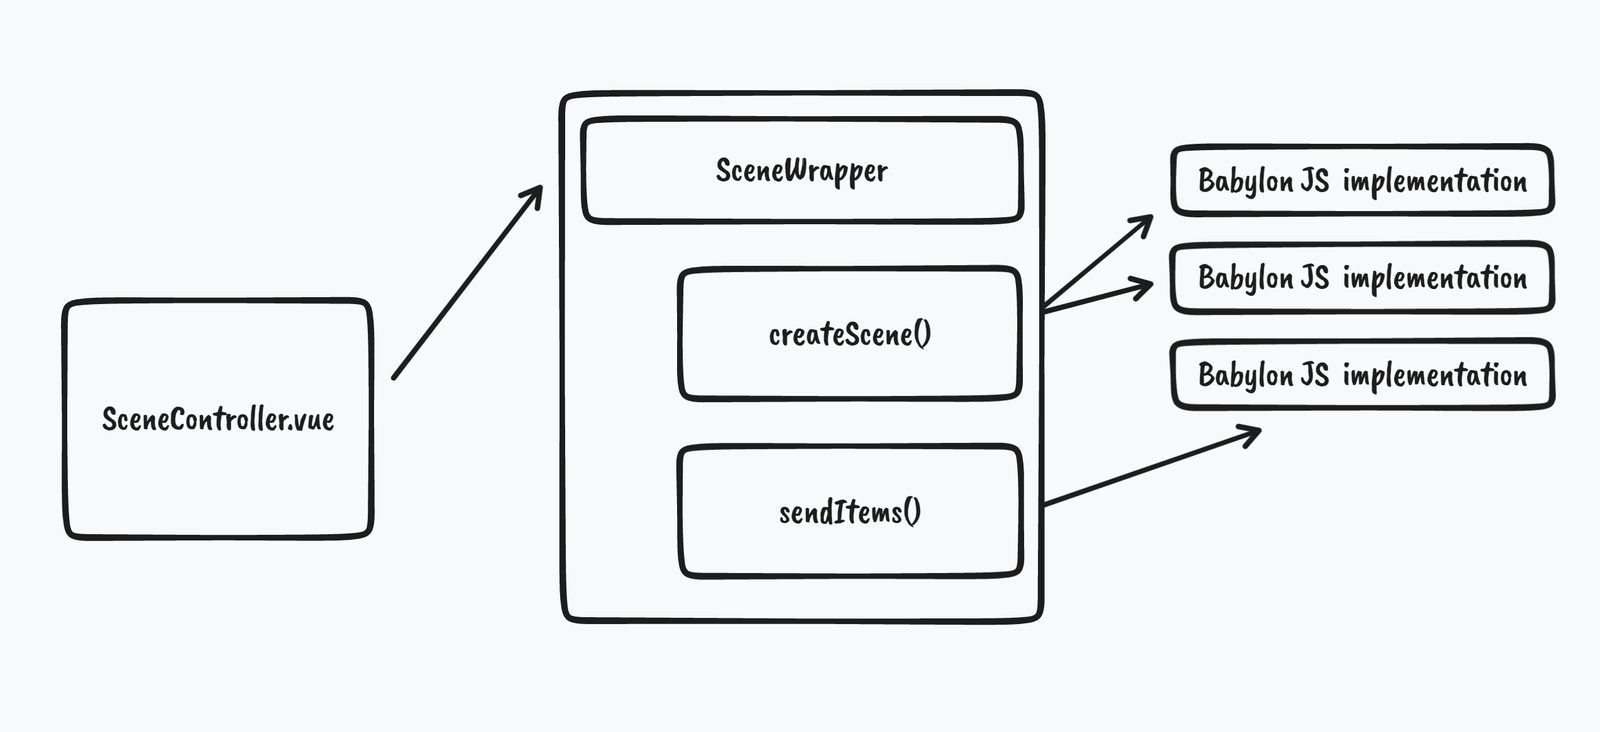
The approach I settled on for this chapter was to leave anything related to API data and app state in a Vue Component, while leaving the internal state of the scene graph alone. The Vue component knows nothing about the internal workings of the scene and the scene knows nothing about the Vue app.
I accomplished this by creating an interface object called Scene Wrapper. This object tracks a handful of properties and has methods needed to create the scene and send data into it. You can check out the Scene Wrapper in the repo: src/scenes/SceneWrapper.js. The functions in the Scene Wrapper call other helper functions to created 2D and 3D objects throughout the scene. These helpers are all stashed away in src/scenes/Scenehelpers.
The Scene Controller Vue component imports the Scene Wrapper object and uses it to create a scene after the component has mounted.
import SceneWrapper from "@/scenes/SceneWrapper.js";
...
async mounted() {
    await SceneWrapper.createScene(document.getElementById("bjsCanvas"));
    SceneWrapper.sendStartButton(this.populate);
  },
The Scene Controller also takes care of loading data from the API and storing it in data using the Vue Options API. The lifecycle is something like this
- Component Created – get API data
- Component Mounted
- Create Scene using the Scene Wrapper
- Pass Start Button callback through the Scene Wrapper
- While Scene Running
- Click Start Button – Execute a callback on the button to trigger the Vue Component to send data into the Scene Wrapper. The callback sends an array of data into the Scene Wrapper, which calls a function to repopulate the Sphere Panel.
- Click on a Compact Card to load data into the Detail Card.

Using the approach described above, I ended up with two-way communication while only really implementing one-way communication. The Vue component always calls into the Scene Wrapper interface with a bit of data, sometimes passing a function that can be used as a callback. The Scene Wrapper calls the helper functions to create objects in the scene graph, passing any data and callbacks along the way. When something in the scene needs to communicate with the Vue component, it just executes a callback, starting the process all over again.
The thing that I like about this interface approach is that it is easy to leave the complexity of the Babylon JS code alone. I think I could even reimplement the Scene Component and Scene Wrapper as a single object using the Vue Composition API. More on that later. For now, I’m going to stick with this.
In the next post, I’ll start building out the control panel. That should give me a chance to test out this design pattern a bit more.
