Babylon JS Day 12
Today was all about setting up the layout for my 3D cards. I started by making a short list of what I wanted to display.
- Title: the name of the card / article / post
- Date
- Note: an excerpt from the article
- Image: a thumbnail pulled from the article
I want to create a 3D object that will list the values above in a simple layout. I started by creating a box object that will represent the card. Then I created a plane object which will hold the AdvancedDynamicTexture on which I draw the content of the card. The plane is positioned just off of the surface of the box.
const card = BABYLON.MeshBuilder.CreateBox("box", { height: 3, width: 2, depth: 0.2 });
  const plane = BABYLON.MeshBuilder.CreatePlane("plane", { height: 3, width: 2 });
  plane.position.z = -0.11;

  var advancedTexture = BABYLON.GUI.AdvancedDynamicTexture.CreateForMesh(plane);
Babylon JS has several controls that I can use for the contents of this texture. I wanted to start with something that would add some structure to the layout. After poking around a bit, I settled on the StackPanel feature of the Babylon JS GUI system. This will let me layout multiple UI controls with some basic rules for how they are placed. It’s not the most sophisticated layout tool, but it will work for the time being.
  var panel = new BABYLON.GUI.StackPanel();
  panel.verticalAlignment = 0;

  advancedTexture.addControl(panel);
I spent the rest of the time today working with text blocks and a simple button. Keep in mind that none of this has seen any design attention yet. I’ll work on styling and general appearance later in the week. For now, think of this card as a prototype.
The only thing I don’t like about the GUI containers in Babylon JS is that they require fixed height values instead of percentages. This leads to a lot of fast iteration as I change padding and height values, constantly refreshing the scene to check slight changes. Not ideal.
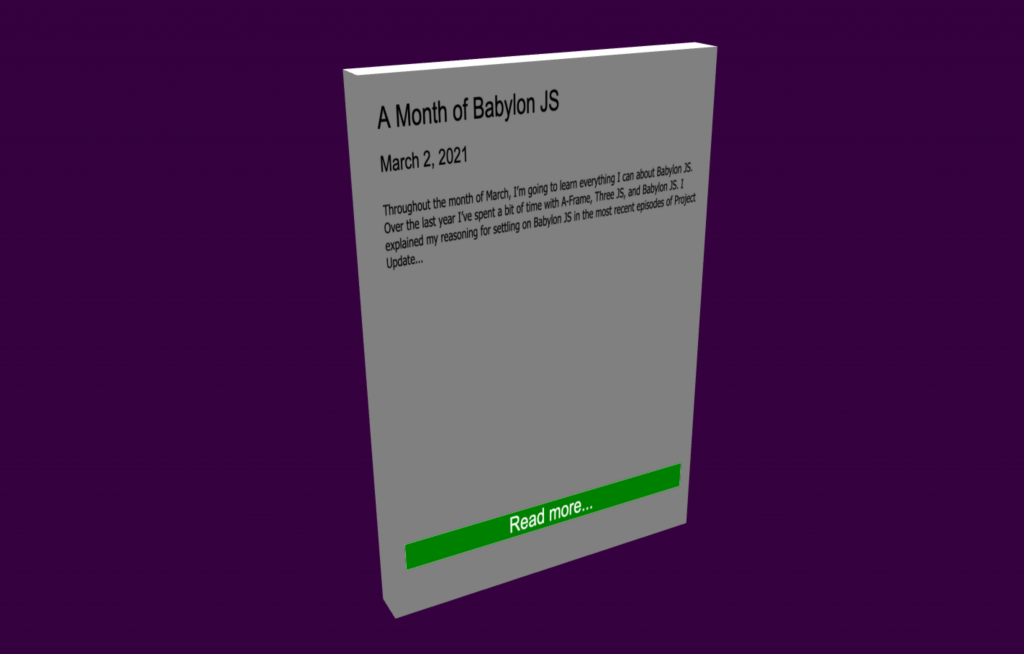
Here the controls that I added today. There is a title at the top with a larger font, followed by the date. Then a larger text block in the middle of the card for the excerpt value. I skipped the image for now. At the bottom of the card is a placeholder button. I’m not sure if the final version will have a button or if the entire card will be a button.
A couple of things worth pointing out:
- While the StackPanel object has padding properties, I found that setting those messed up the text wrapping on the excerpt text block. I had to remove the padding from the StackPanel and add it to each control.
- I couldn’t find mention of any sort of “spacer” control. Something that would let me push the button to the bottom of the card, dynamically resizing based on the content around it. I also could not find a way to anchor only the button to the bottom of the card while anchoring everything else to the top.
 var title = new BABYLON.GUI.TextBlock();
  title.text = "A Month of Babylon JS";
  title.color = "black";
  title.fontSize = 48;
  title.height = "100px";
  title.textHorizontalAlignment = 0;
  title.textVerticalAlignment = 0;
  title.paddingTop = 40;
  title.paddingLeft = 40;
  title.paddingRight = 40;
  panel.addControl(title);

  var date = new BABYLON.GUI.TextBlock();
  date.text = "March 2, 2021";
  date.color = "black";
  date.fontSize = 36;
  date.height = "80px";
  date.textHorizontalAlignment = 0;
  date.textVerticalAlignment = 0;
  date.paddingTop = 20;
  date.paddingLeft = 40;
  date.paddingRight = 40;
  panel.addControl(date);

  var note = new BABYLON.GUI.TextBlock();
  note.fontFamily = "Tahoma, sans-serif";
  note.text =
    "Throughout the month of March, I’m going to learn everything I can about Babylon JS. Over the last year I’ve spent a bit of time with A-Frame, Three JS, and Babylon JS. I explained my reasoning for settling on Babylon JS in the most recent episodes of Project Update...";
  note.textWrapping = true;
  note.color = "black";
  note.fontSize = 24;
  note.height = "660px";
  note.textHorizontalAlignment = 0;
  note.textVerticalAlignment = 0;
  note.paddingTop = 20;
  note.paddingLeft = 40;
  note.paddingRight = 40;

  panel.addControl(note);

  var button1 = BABYLON.GUI.Button.CreateSimpleButton("but1", "Read more...");
  button1.width = 1;
  button1.height = "100px";
  button1.color = "white";
  button1.fontSize = 50;
  button1.background = "green";
  button1.paddingTop = 20;
  button1.paddingBottom = 20;
  button1.paddingLeft = 40;
  button1.paddingRight = 40;
  button1.onPointerUpObservable.add(function () {
    alert("you did it!");
  });
  panel.addControl(button1);
I have a lot of work left to do on this card. I hope to finish it up tomorrow and then make a version that I can clone and populate with data.